Rack It Up
In many security
video installations, the equipment racks can be large and numerous, densely
packed with equipment, and with a huge tangle of cables.
Good planning is the key to any infrastructure installation – and that goes double for security systems. The design must be scalable and support both the robust performance of the equipment and the ability of personnel to operate effectively within that facility.
The plan should also allow for rapidly changing technology. For example, modern digital equipment places specific demands on installations in terms of physical support and protection, power and thermal management, and even the routing and bundling of cables to ensure it works as expected. As changes in equipment or the operation are needed, proper advance planning will also provide for easy access for maintenance and upgrades without having a negative impact on the operation.
Whether you are designing a massive operations center or a single small security workstation, many of the planning topics you should discuss with your integrator are similar. This article will discuss some common issues that will confront the designer of a modern security facility and offer guidance on effective solutions to include in your planning discussions.
SPACE MANAGEMENT
It may seem obvious, but at the start many people neglect to properly plan the location of the security systems. If at all possible, make sure that adequate space is allocated early in the project, specifically for the security system. There are three spaces to consider:- Space for the operator (the person monitoring
security);
- Space for the security equipment and foreseeable
upgrades;
- Space for service and maintenance activities.
OPERATOR SPACE
In the past, security monitoring stations were often heavy, monolithic structures that held a combination of CRT monitors and electronic gear. While we still see some new installations using this approach, fewer organizations have the luxury of having dedicated security monitoring staff.Instead, the monitoring function might be combined with some other function, such as a building reception desk. In these cases, a more attractive, lighter appearance is usually desired, and the operator must retain a clear view beyond the monitors. The advent of LCD monitors has made it much easier for security desk manufacturers to offer attractive, flexible workstations with provision for mounting one or more security monitors that can sufficiently meet this need.
So, when planning the operator space, it is important to understand what functions the operator will be performing, how many observation monitors and/or other controls are needed, and what sight lines must be maintained. In many applications, the space for security monitoring is easily estimated and can be integrated into other planned space.
EQUIPMENT SPACE
Another key change from older security installations is the type, nature, and location of the support equipment.In the past, analog cameras sent signals over coax to monitors and tape-based recorders. Today, it is likely to be IP cameras connected to an IP network, or coax that goes directly into the hard drives or data servers (DVRs and NVRs). This is more than just a change of formats – it has opened up new functionality and new benefits for users and installers as well. For example, the recording equipment can be located in a remote, protected place (for example, telecommunications closet or data center) and does not have to be accommodated in the front lobby where the monitoring is taking place.
To deliver this functionality, the new security system installation will look very similar to the company’s data network installation. And the space required will look very similar to a data center – or, it may be located in the data center itself for larger systems.
In either case, it is very likely that any new security installation will make use of equipment racks (or enclosures) to hold the processors, recorders, and backup systems, so this should be considered in the planning.
Proper enclosures support, organize, and protect the equipment, so they should be considered to be as important as the equipment they are holding. Be sure to choose a high quality enclosure with sufficient space and weight capacity. The proper use of enclosures has the effect of “increasing space” by housing a large amount of equipment in a small amount of floor space.
Make sure that you allow extra space in the racks themselves for future upgrades and expansions. Some installers recommend 20 to 25 percent extra capacity for future expansion, but you can use your best judgment in your discussions with your integrator. For example, if you require 40 rack units (RU) equaling 70 inches of equipment height, you might specify 50 RU of rack space to accommodate future growth.
SERVICE AND MAINTENANCE SPACE
Note that planning space for the equipment rack will not be enough for an effective installation. Installation and service staff will have to gain access to the back of each rack as well as the front. For this reason, most data centers locate the racks in the center of the room to provide front and back access.If space is limited, then there are other options that might help. For example, some manufacturers offer wall-mount racks that can swing open to allow access to the back of the mounted equipment. These wall mount racks can be fairly large (40 rack units or more) so they may meet the needs of many medium sized applications. Remember to plan for the pivoting clearance – these cannot normally be mounted close to other objects on one side.
Another option is racks that can slide out to provide access to the back of the equipment – these can be placed against a wall, which saves space until service is needed. Manufacturers, such as Middle Atlantic, for example, have racks that are designed to roll out and then rotate 60 degrees – fully loaded with 750 pounds of equipment! These units can be real space-savers when used in an appropriate installation.
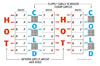
Most industry
specialists agree that the optimum layout for high heat density racks is an
arrangement in rows of two, to produce hot and cold aisles. The fronts of the racks should face each
other in the cold aisle, with air grating down the center for cold air
supply. The rear of the racks should
face each other in the hot aisles, with return grills overhead for optimum
utilization of the air conditioning system.
THERMAL MANAGEMENT
Remember, though each issue has been separated into its own separate section, they are all closely interrelated. For example, thermal management (the control and removal of damaging heat) strongly depends on equipment placement, equipment and rack spacing, and cable management, among other factors. You must account for this interaction to have a successful installation.There has been a fundamental shift into using digital equipment over the years because of the speed, flexibility, and reliability of the technology. That’s the good news; the bad news is that digital equipment emits greater heat and heat is an enemy of that equipment. For most digital equipment, 85 degrees Fahrenheit is the maximum recommended constant operating temperature. Most studies have shown that for every 10 degree rise over 85 degrees, digital equipment life is reduced by approximately 40 percent.
As if that equipment life reduction wasn’t bad enough, there is an even greater threat to equipment for security systems: The Uptime Institute, through its research, has found that “For every 18 degrees Fahrenheit increase above 70 degrees Fahrenheit, long-term reliability is reduced by 50 percent.”
So clearly, with a security system that may be responsible for everything from employee safety to theft prevention or insurance compliance, thermal management to extend the life and reliability of the security equipment is paramount.
This space does not allow for a thorough explanation of thermal management (for an excellent white paper concerning thermal management in equipment installations, go to middleatlantic.com). Here is a quick review of passive and active thermal management that provides for a basis for discussion with your integrator when relating to the design of the security space.
Passive thermal management moves heat primarily through the process of convection. Vents are located at the front and bottom of a rack or console to draw air into the equipment space. Equipment in the rack heats the air, which then becomes lighter and starts to rise within the enclosure. As the warm air rises, it draws cool air in through the vents at the bottom. In order for the heated air to escape, there must be a path through the enclosure all the way to the vents at the top of the rack.
The corollary to this technique is active thermal management. In an active system, fans are used to draw the heated air out at a greater rate, increasing the rate of heat removal. Active thermal systems are needed for systems that have densely packed equipment (that generates more heat in a given space) or for systems that use high-heat components (such as modern servers). In both these cases, the amount of heat that needs to be removed is more than can reliably be shed using a passive system. If you need active cooling, look for enclosures that have quiet fans and also the option of thermostatic control. With a thermostatic fan controller, the fans will run only when the temperature requires it, and only as fast as needed, thereby reducing noise, extending the life of the fans, electricity costs, and reducing the amount of dust that is drawn into the enclosure.
For both active and passive thermal cooling, give some attention to the space where the equipment will be located. It does no good if you have an active thermal management system exhausting air from the enclosure into the same small room, thereby raising the temperature of the room. The heat that is being removed from the equipment needs to go somewhere; either the room must be large enough to absorb the heat coming from the equipment, or the room itself must have air conditioning.
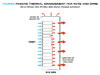
The most common
airflow found in most DVRs, NVRs and higher current draw equipment is that
which pulls cooler air in from the front with the aid of front-intake fans, and
exhausts the heated air towards the rear or sides. Effective thermal planning
for the NVR or DVR equipment cabinet involves the use of large perforated front
& rear doors that ensure a minimum of 64 percent open area for adequate
airflow into and out of the cabinet.
CABLE MANAGEMENT
When your security integrator includes some time and materials for cable management, that is a very good sign. Here’s another reminder about the interrelated nature of all these issues: Poor cable management can degrade thermal management, serviceability, and even the performance of digital equipment. Today’s high-performance cabling can be damaged by pulling too hard on it (as when pulling cable through a ceiling or duct) or even by bending it too sharply. If the system is installed using good cable management practices, then it has the best chance of meeting performance and life expectations.In many larger security system installations, the equipment racks can be large and numerous, densely packed with equipment, and with a huge tangle of cables. Because of the importance of these systems, it is critical to be able to quickly locate specific gear, troubleshoot it, and replace it if necessary. An orderly installation, using some straightforward guidance, will help security personnel be more productive and increase safety.
The weight of the cable itself should be supported as it approaches the equipment, as it enters the rack, and all the way to its connection with the electronic equipment. Many products are available now to do this task efficiently, including lacing bars and other “entry” treatments such as vertical cabling ducts, ladder bars, and similar items. Without support, a high performance cable can become damaged simply from its own weight – putting stress on a connection, pinching the insulation at a sharp edge, or even damaging the circuit board of the attached equipment. Good cable support protects the cable and the equipment from damage. The cable manufacturer for the project can provide information on allowed pull tension and bend radius.
Note that bend radius is one key to cable performance, not only because some cables can be broken at tight bends but because the data-carrying speed of the cable can be diminished if it’s bent too much, or even when wire ties are cinched too tightly. This can result in the system not being able to perform up to specifications. Thus, even when pulling cable, installers must be careful not to pull too hard since even that can cause pull tension to be too great and degrade cable, before it’s even in operation!
For space planning, it is also important to know where cables will be coming into the room and where they will be routed to the equipment. If the equipment will be installed in a room with a raised floor, such as a data center, do not assume that the raised floor will take care of all the cable routing issues. Many racks are not designed for use in raised floor applications. It is important to make sure the proposed enclosures are designed for these installations. The best manufacturers can provide raised floor bases in common heights and enclosures that have an open bottom so that floor tiles don’t have to be cut to gain access.
POWER DISTRIBUTION
It is important to discuss with the integrator the plan for the entire system’s power requirements early in the project. While it is not in the scope of this article to provide advice on electrical issues, (because every city and state has its own local codes; consult an electrician) there are some useful practices to be aware of.First, just as you provided some extra space for upgrades and expansion, you should consider providing slightly extra power capacity for expansion as well. Depending on your local rules, this advance planning may include using heavier gauge wiring, a larger service subpanel, or other items.
You should also consider whether the equipment power will be provided with UPS capabilities, a backup generator, or some other method to keep the system operating in the event of a power failure.
Even if it is not critical to stay operating during a power failure, what do you need to happen when power is restored? Can the system be built to reactivate the equipment automatically or will human intervention be needed?
Depending on the intention and design of the system, there are options that can support your power needs. For example, there are “sequenced power” systems that will apply power to the desired equipment in a pre-determined sequence, rather than all at once. This approach can minimize supply disruptions and may also help when some equipment is more sensitive to input fluctuations than other equipment.
It is also very important to plan effective electrical grounding and bonding. Equipment racks and enclosures can make this easy or difficult – be sure to choose a manufacturer with clear support in this area.
SEISMIC CONSIDERATIONS
Much like electrical standards, seismic regulations depend on local code because the severity and frequency of seismic activity varies throughout the country. Your local facility manager or building inspector can tell you what regulations may apply.If your facility is located in a fault zone and local code requires that your building be prepared for those seismic events, then your security infrastructure must do so as well. You will need a rack that is seismic certified and the installer must follow through with specific installation procedures when integrating the enclosure.
For example, some regions require the use of reinforcing brackets and specific strength-rated bolts to fasten the enclosure base to the floor. The weight of components when the rack is populated must be the heaviest at the bottom ascending toward the lightest equipment at the top of the rack.
REMOTE MONITORING
As mentioned above, it is increasingly common for the core security system equipment to be located remotely – either in a protected room or along side the data networking equipment. In any case, it is unlikely that anyone will be watching the equipment, on the lookout for developing problems.Today, this function can be assigned to remote monitoring products that will constantly monitor temperatures, power levels, humidity, door openings, and a wide range of elements to help system managers keep their installations running. Many of these products can even be configured to send alerts to key staff, such as the security manager, when issues are detected.
Consider it security for your security. When the assigned security staff receives threshold alerts – for a quickly rising temperature, for example – it allows developing situations to be addressed before they become big problems, and adds to overall system reliability.
In the end, whether it’s designing the space, choosing the right enclosures for that space, or managing cable, thermal and power issues, proper design and advanced, informed communication with designers and integrators will ensure a successful security installation.
SIDEBAR: Best Practices of Space Management
- Plan early for security system space – not just the
operator station, but also the equipment space and the space needed for service
and maintenance.
- Provide for future expansion.
- Be sure to examine all available equipment mounting
options.
- Check to see if you need seismic-certified enclosures.
SIDEBAR: Best Practices for Thermal Management
- Provide for the removal of heat from your equipment
and enclosure.
- Provide for the removal of heat from the room, if
necessary.
- Use a thermostatic fan controller when possible.
SIDEBAR: Best Practices for Power Distribution
- Determine your overall project power strategy
early.
- Conform to all electrical codes.
- Provide extra capacity for growth if possible.
- Determine your need for backup power.
- Check to see if you need power sequencing or other
specifics.
- Review grounding and bonding plans to ensure safety and also to maximize system performance.
SIDEBAR: Best Practices of Cable Management
- Check manufacturer specs on pull tension and bend
radii for selected cables.
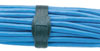
- Don’t use wire ties or other thin materials that
might damage wire insulation, use wider
Velcro or hook and loop when dressing cables.
- Make sure the cable is supported all the way to
equipment connections – use appropriate cable management products.
- Keep signal and power cables at least four inches
apart – if possible, on opposite sides of the enclosure, to minimize
interference.
- Label cables – it makes adds, changes and
troubleshooting easier.
- Try to use short power cables when possible to reduce possible interference.
Looking for a reprint of this article?
From high-res PDFs to custom plaques, order your copy today!


.webp?height=200&t=1695306996&width=200 "computer next to phone on red stand")