VIDEO Surveillance: Achieving Picture Perfection
Similar to traditional photography, camera placement can be one of the most important aspects of a quality security video system. The difference between a good identifying and a video of someone just walking by can be as small as the proper placement of the camera.
There are several important factors that impact what location is the best for any given camera, all of which should be considered carefully at the time of the design and installation. Lighting conditions, field of view, accessibility for service and protection from damage and sabotage all can have a big impact on the optimum location. While it is important to make sure the camera is easily accessible for future service, maintenance and repair, it should not be easily accessible to the general public or anyone hoping to disable the camera.
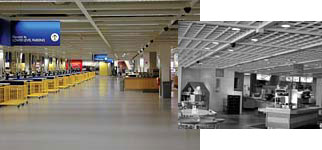
Before one can determine the best location for a camera one must know what is the purpose of that camera. Is it intended to look at a specific subject or type of activity, or is it designed to provide a general overview of a particular area? Cameras placed in locations solely for the idea of having a camera there are really taking a chance on whether they will capture anything relevant or not. Cameras with a specific purpose can cover that purpose and provide the best quality of images at all times. For example, cameras are often used in the lobby areas of many businesses. If the camera is randomly placed just to have a camera in the lobby, it could be installed anywhere and the likelihood of capturing relevant images may be slim. If, however, the camera in the lobby watches for illegal removal of property or illegal access through a particular doorway, the camera can provide the best coverage and viewing area for that particular door.
In the example above, it is important to note which direction of traffic flow is of the most concern – people entering the doorway, or people exiting through that door. If the biggest concern is to capture people exiting from that door and to clearly see what they are carrying or doing, the camera should aim directly at that doorway from the exit side. If the camera is to look at all people entering the doorway, the best camera placement may be on the other side of the door, viewing people from the front as they enter. A view of the back of everyone as they enter may not provide the detail needed should an illegal entry be caught, and would probably not provide adequate identification for future use as evidence.
Once the desired field of view is determined, it is important to look at what items within the image could impact the picture quality. Poor lighting could mean that backlight compensation is necessary, or if the lighting differences are too extreme, you may need to adjust the camera location to help overcome the problem. Plants, furniture and other obstacles that obstruct the view can impact the camera location and angle and should be evaluated during the installation. Viewing angle is also important. If the camera is too close to the door and too high, the display may only show the top of a person’s head and not provide a good identifying shot. If it is too far away or the wrong lens is used, the viewing subject could be too small to identify. If identification of people is the primary camera purpose, a location should be selected that provides the best frontal view of the subjects in most situations and the best overall lighting conditions.
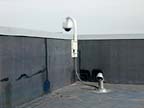
Looking at the same example, care must be taken to ensure that the camera is not mounted too low, allowing anyone passing by to tamper with the camera or reposition it. At the same, time it must be located in a position that allows service and maintenance personnel to access it without tremendous difficulty or special equipment. Indoor cameras can usually be located to allow access with a standard ladder, either high on the wall or ceiling mounted. If an area has a very high ceiling, it may be best to mount the camera on the wall at a height that can be reached with a ladder. Outdoor cameras usually have a much wider range of mounting options and applications, many of which can impede future access for service and maintenance. On multi-story buildings, cameras are often placed on wall mounts that are too high for traditional ladder access. This means that for the installation and for future service, a lift or scaffolding may be required. This adds additional equipment, costs and labor to the camera installation, often unnecessarily. The same camera could have been mounted either low enough to be accessed with a ladder, or installed on the roof with a parapet or roof mount. When the camera is roof-mounted, a mounting bracket allows the camera to pivot in over the roof for service, installation and setup. This takes much less time, much less equipment and is usually far safer for installation and service personnel.
A little advanced planning goes a long way in providing a high-quality camera system that is not prone to vandalism while keeping the installation and service costs to a minimum. Many high-quality cameras are equipped with backlight compensation and digital signal processing, so use these to overcome unique lighting situations.
Looking for a reprint of this article?
From high-res PDFs to custom plaques, order your copy today!